Saturday, September 21, 2013

Crafty Creatives box 15!

Wow, this month has been absolutely crazy so far. I have not had a second to sit down and craft apart from making more new displays for my things at the shop, and those were late-night panic-filled endeavours! I have however been acquiring a few crafty things, some of which work perfectly with this month's Crafty Creatives box!


Can I just say I was way too excited to see more new surround paper? This stuff is always neatly packed into my 'paper crafts' box for future use!


This month's box was 'Monochrome'! I have been working on covering my (currently unused) keyboard tray with a monochrome sharpie doodle and I've been looking at lots of inspiration lately- this art card provides even more! I can't wait to get this one up on the wall.


More felting in this month's CC kit! I have to say that while I'm ever-so-slightly sad that it's not a new skill, I'm happy to learn to 3D felt! This will be a fun one to do, and I know that the felting kit Woodland box was extremely popular (it's one of my personal favourites!)


I am a little bit crazy when it comes to collecting little notebooks/sketchbooks/what-have-you and this made me squeal a bit! The pen and pencil are of a beautiful quality as well so I'll be sure to fill this little book with lots of sub-par attempts at drawing, but I'll love it!


And here it is all out as usual:

  • Art card by Jo Newham
  • CC kit: felted sheep
  • double-sided domino beads
  • graphite pencil
  • polymer clay rose
  • mini blackboard peg- I love this!
  • Stabilo Sensor pen
  • Crafty Creatives doodlebook
  • tea bag folding squares
  • sheet of Aubrey Beardsley prints
  • black and white sewing pins
  • fat quarter of black and white fabric
It's a great box- while I love boxes with a strong theme, I think that this box (and the Blue box) provides such a good opportunity to get seemingly-unrelated items together, and it all looks so great together. I love that this box has so many crafty essentials, and that though the kit is a skill I've already been taught by the CC gals, it's another level up. I'm also interested to try the tea bag folding as I'd never even heard of it before now!

But of course, I am not one to leave things black and white... so I took my newly-bought pile of brightly-coloured Sharpies to my fabric... and I love it even more.


Tuesday, September 3, 2013

Crafty Creatives Box 14- 'Western'

Crafty Creatives box 14 landed several weeks ago, but we were away on holiday! Finally last Friday this box was redelivered, and though I hadn't managed to avoid seeing what this month's theme and contents were, it was still nice to get my pink parcel!


First I'm going to show off a few photos of where were were. My own ancestral homelands (not really) of Illinois. Flat, hot, and corn (and soybeans).


Ahhhh, the country life.


So perhaps strangely fitting that this month's box was very North American themed! Though, I was not in the wild west- this box's theme was 'Western'!


Native American culture is something I've grown up treading very lightly around. My American ancestors go back mostly to the Revolutionary War, so I know there have probably been some along the way who have not been the best of neighbors to those who were displaced. Appropriation is tricky, and in some cases inappropriate. That said, I think this art card is beautiful and I think for the most part this box was handled lightly.


The kit for this box was a dreamcatcher- an obvious choice! I look forward to getting the feathers in box 15 so I can finish this one off properly. Although I do have to point out that as they originated from the Ojibwe people they are technically not 'Wild West' but more 'wild north'!  


There was also a second kit in this box- a rope basket. This one looks a bit trickier, I have to admit.


There was a good selection of beads and charms in this one, including a generous amount of star studs.

click to enlarge!
A quick rundown of my box's contents:
  • Art card by Anastasia Alexandrin
  • CC kit- dreamcatcher
  • Extra kit- rope basket
  • two strings of turquoise beads
  • lots of bronze star studs
  • five feather charms
  • 1 metre suedette floral cut trim
  • piece of fleece
  • purple stone bear bead
  • two pieces of recycled denim
  • two sheets of craft paper

I got some great fabric when I was back in the US and have some plans already- what do you think?


Tuesday, August 20, 2013

Easy Nail Polish Earrings

A few months ago I saw a very effective and simple way of making some great earrings- and whatever your style is, you can make them 'you'! With your favourite nail polish (or just some that you think would make great earrings) and just a couple of glass cabochons, earrings are born!


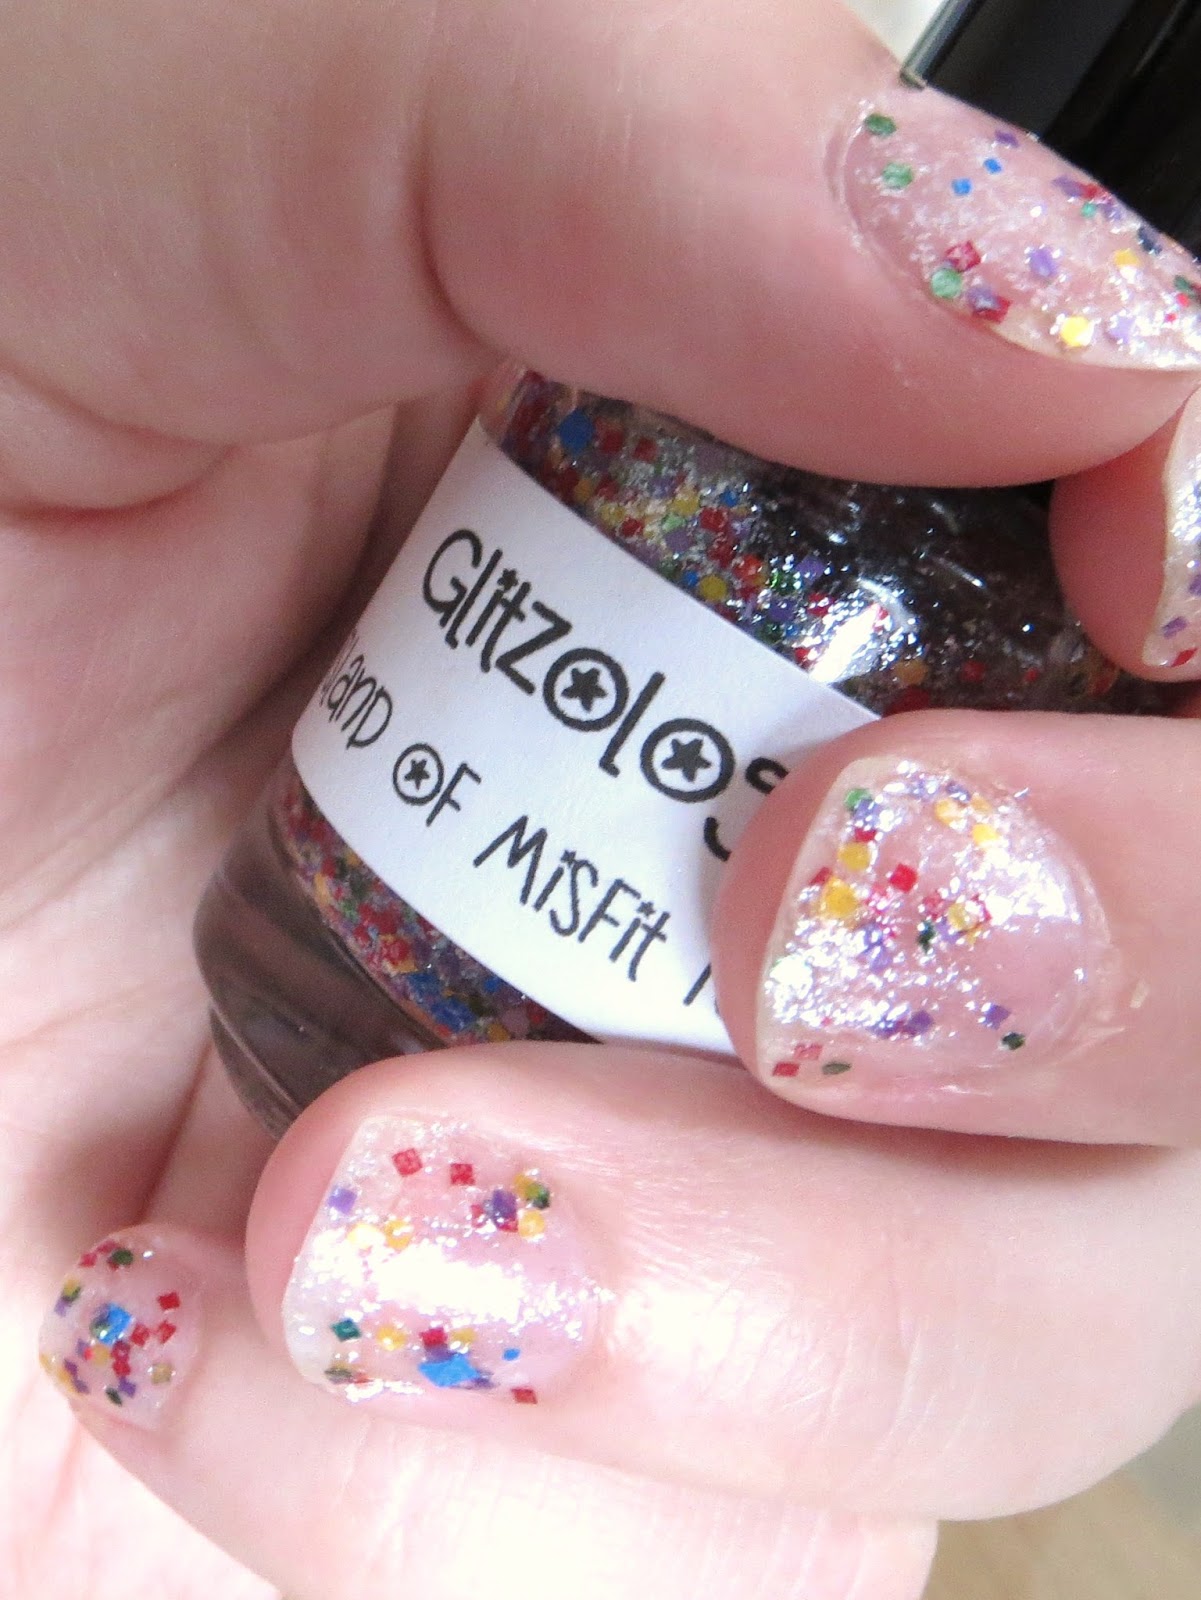
The hardest part is probably picking the nail polish you want to use. But the great thing about this is that if you buy a pack of cabochons, you can make a ton of coordinating earrings. For this tutorial, I used Island of Misfit Toys by Glitzology, a sheer polish with lots of rainbow glitter.


The problem with glitter fingernail polish is that when I work with clay, it tends to come off and spoil the clay, so I don't get to wear it on my nails much. Wearing it as earrings softens the blow a bit!


In addition to the nail polish and the cabochons you'll need a good craft glue and some earring posts that aren't bigger than the cabochons. (They're not pictured, but don't forget the earring backs, either!)


So here it is: Paint the back of your cabochons with nail polish- more coats if you want it to be darker though the silver posts will help it. When they're very dry, carefully glue them to the earring posts (being especially careful if you are using a solvent glue as it'll work like fingernail polish remover and pull the polish from the glass).


And that's it. Great little earrings that will coordinate perfectly. You can also do this with larger glass cabochons and make pendants for a coordinating necklace. 


Cabochons can be found cheaply from most craft stores and online, making these a nice inexpensive addition to your jewelry box- and you'll probably end up making multiple pairs!


What polish will you use? Do you have a favourite?


Saturday, August 17, 2013

July in review

Don't you love finding little 'treasures'? I came here thinking I'd post a different entry and found this one left unposted! So, without further ado- a quick roundup of what I worked on in July (besides a large string of Crafty Creatives makes, of course!)


School in the UK ended in July, so apples were in order- I made these big chunky apple pendants and some half-apple brooches, which went down well with the teachers!


A few bulk orders for July as well- first up was this big pile of charms and keyrings for a school fete- the school's emblem is some oak leaves and acorns with a cross, and the children loved them.


I also made these cute badger earrings (and some charms for bracelets) for the North East Essex Badger Group! They were so so teeny!


Technically I made these starfish last winter, but I only re-found them this summer and turned them into earrings and this tri-pendant necklace. 


Now this was a fun commission. A nice chunky pendant, I made the outside of the box with some layered red and white clay, and carefully shaped each piece of popcorn as it went 'in' the box!


And on the non-foody side of commissions, this little sun pendant went to a little girl who I hoped loved it just as much as mine did!


These, along with pandora-style charms, were another new idea for the month. Pearlescent clays and stamps made some pretty cute pendants!


I also had a request for 'just a pear'- no jewelry findings, just the little pear. I couldn't decide on a size, so I sent both!

I did a few other things, which will be viewable in my shop once my little break is over- and this month has already been very productive!

I'll leave you with the goal and movie/book pages for both June and July- I'll be back on Monday with a quick and easy but fun tutorial!


Wednesday, August 7, 2013

Tutorial: polymer clay pretzel necklace

Using pastels to colour polymer clay is something that I've seen done a lot but never tried. I tried it recently with some burger charms and saw good results, so I thought I'd incorporate it into this month's tutorial- pretzels!


For this you'll need only a small amount of clay (I used Fimo Soft #7 caramel, lightened a bit with white), some sienna pastel, and, if you have it, glass sugar! 


Make a long 'snake' of clay- thicker if you want a soft chewy-looking pretzel, and thinner if you want a crunchy-looking pretzel!


Make a 'U' shape with the snake, and then bring the tops of the loops back down onto the bottom of the 'U', crossing over each other. Don't worry if it's not a perfect shape as you can fix it later. Very carefully flip the pretzel over, using a tissue blade if you want to, and trim the ends as long or as short as you like. If you want your pretzel to look softer, gently press down on the places where the clay meets, otherwise just give them a quick touch to make sure it all holds together. Reshape the pretzel now if it's not quite how you want it.


Here's the fun part. Using a craft knife, scrape the top of the pastel chalk, leaving some dust. Pick it up with a paint brush, being careful not to take too much at once.


Very gently apply it to the pretzel. The pretzel looks more real if you don't cover it too thickly or too evenly, so don't worry about it too much. Keep a piece of clay from the scraps next to you as you do it- I found this helped me gauge how dark my pretzel was going, as it was hard to tell sometimes!


You can see the change in the colour here- I did four pretzels and this was the darkest one. 


Leave the back of the pretzel un-chalked- if you have bits of unwanted chalk dust clinging to the back, it's easiest to scrape or sand them off after the clay has baked, or you may risk smearing it around more than before! Bake your clay now.


If you want your pretzels to look salty, get some of this. It's fake salt/sugar for crafts, made from glass so it doesn't distort when baked with polymer clay. I found mine cheaply on Etsy. A little goes a LONG way.


Varnish the pretzels, and as soon as you varnish the tops, sprinkle a little bit of the craft salt on top so it sticks to the wet varnish. Let it dry, and then add another thin layer of varnish to help secure the salt so it won't brush off when worn.


I liked my fat soft pretzels better when I was doing the first steps, but when finished this skinny pretzel was by far my favourite. Once the varnish has dried, all you need to do is find a big enough jump ring to go around one of the loops of the pretzel, and it's ready for a chain!


These were very quick and easy to make, and just look how CUTE the necklace is! If you can't find craft sugar, you could probably also make salt by grating a piece of baked translucent clay, but it won't be quite as translucent as this glass sugar.

I have a few tutorials to catch up on- so if you'd like to see me attempt anything new or show you how I do something, please let me know! <3


Wednesday, July 31, 2013

CC Makes Galore!

One of my one hundred mini-goals for 2013 is to do every Crafty Creatives kit. I'm a bit behind, and box 13 threw me a loop by having not one, but five kits in it! I've been managing to fit them in to free time here and there, especially as I wait for things I need for my main polymer clay business, as well as a few other things. I still have two left to do, but I thought I'd share what I had done so far!


The first two I did were the paper and the stocking flowers. Actually, my 7-year-old daughter did the paper one, which I think looks pretty good considering I only really helped her glue it! When she saw my stocking flower she wanted one for herself, so I made her one:


As you can see, by the time I'd photographed it, it got a bit squashed from riding in her handbag to and from her grandma's house! The kit has enough to make at least 2-3 more, so I'm sure I'll be drafted to make another, soon!


I learned from my mistakes when I made the french beaded flower! I made two to start and let my daughter choose which one she wanted. She correctly chose the one on the left! I used some bigger 8/0 sized beads that I had for the stamens since my colours were similar. I'm definitely going to be making more flowers, especially since I bought this-


a bead spinner! I beaded about 3ft of wire in about 20 minutes. It's great and I love it. The kit had enough beads for two flowers but probably not enough for more unless I mixed the two colours together, but that didn't stop me playing with the bead spinner some more.


I made these triple-wrapped bracelets with some of the remaining beads and some that I'd found in my stash! They're 21" long wires that wrap, or I suppose could be worn as a necklace as well! 


The hummingbird pendant from the box was made into this simple necklace with some turquoise flower beads. Going to give this one to my mom, I think!


I also finished my cross stitch from box 12. I'm definitely going to be making at least one more of the four patterns supplied with the box, but this had to be the first. 


And I'm mid-project on this one- I didn't sew the outer beads on correctly and need to go back to reinforce them, so I of course set it aside for now. I have a lot of clay work to do this week now that I can get into it again, but this was a lot less daunting than I thought it'd be, so I'm not worried about catching up on it.

After that, and the other two flowers, I'll have just the blue bird mobile to do and the dreaded crochet mouse way back from box 5! I can make a very lovely chain... and that's about it! I will have it done though, and as another of my goals is to make a simple but nerdy amigurumi, I'll have to do it soon!

I'll have the other two flowers up to show you guys sometime next month- if I can stop making the beaded ones!